这篇文章主要讲述的是Android序列化与反序列化中出现的漏洞以及其利用的方法
文章首先会介绍一些与漏洞相关的Android基础知识,然后会介绍launchAnyWhere: Activity组件权限绕过漏洞解析,之后会介绍如何利用序列化和反序列化的漏洞来绕过launchAnyWhere的补丁
Android 基础知识
Activty
Activity是Android的四大组件之一。是用户操作的可视化界面;它为用户提供了一个完成操作指令的窗口。当我们创建完毕Activity之后,需要调用setContentView()方法来完成界面的显示;以此来为用户提供交互的入口。在Android App 中只要能看见的几乎都要依托于Activity,所以Activity是在开发中使用最频繁的一种组件。
Android应用里面都有一个AndroidManifest.xml文件,用于配置应用里面各种组件,包括Activity。当Activity的配置里面包含android:exported=”true”或者配置了intent-filter但是没有配置了android:exported 的时候,可以被其他应用调起该Activity。如果没有配置的话,只能被当前应用的其他组件调起,或者系统应用调起。
Intent
Intent 是 Android 非常常用的一个用于组件间互相通信的信息对象,常用于启动组件和传递数据,大部分的程序里都有着他的身影。
Parcelable
Android提供了独有的Parcelable接口来实现序列化的方法,只要实现这个接口,一个类的对象就可以实现序列化并可以通过Intent进行传输,Intent也是一个Parcelable类,下面示例是Parcelable的典型用法。
1 | public class MyParcelable implements Parcelable { |
其中,关键的writeToParcel和readFromParcel方法,分别调用Parcel类中的一系列write方法和read方法实现序列化和反序列化。
Bundle
可序列化的Parcelable对象一般不单独进行序列化传输,需要通过Bundle对象携带。 Bundle的内部实现实际是Hashmap,以Key-Value键值对的形式存储数据。例如, Android中进程间通信频繁使用的Intent对象中可携带一个Bundle对象,利用putExtra(key, value)方法,可以往Intent的Bundle对象中添加键值对(Key Value)。Key为String类型,而Value则可以为各种数据类型,包括int、Boolean、String和Parcelable对象等等,Parcel类中维护着这些类型信息。
1 | // Keep in sync with frameworks/native/include/private/binder/ParcelValTypes.h. |
launchAnyWhere Activity 组件权限绕过
这个是关于Android系统Service:AccountManagerService的一个漏洞,我们首先来介绍一下AccountManagerService
AccountManagerService
很多手机上的应用都提供了账号授权的功能,例如微信、支付宝、邮件、Google服务等,于是Google提供了一个AccountManagerService,用于管理用户的各种网络账号,其他应用可以通过AccountManagerService获取这个账号的token,用来请求一些网络服务。
因为每个应用的登录方式和token获取方式肯定存在差异,因此AccountManager的身份验证也被设计成可插件化的形式:由提供账号相关的应用去实现账号认证。提供账号的应用可以自己实现一套登陆UI,接收用户名和密码;请求自己的认证服务器返回一个token;将token缓存给AccountManager。
可以从“设置-> 添加账户”中看到系统内可提供网络账户的应用:
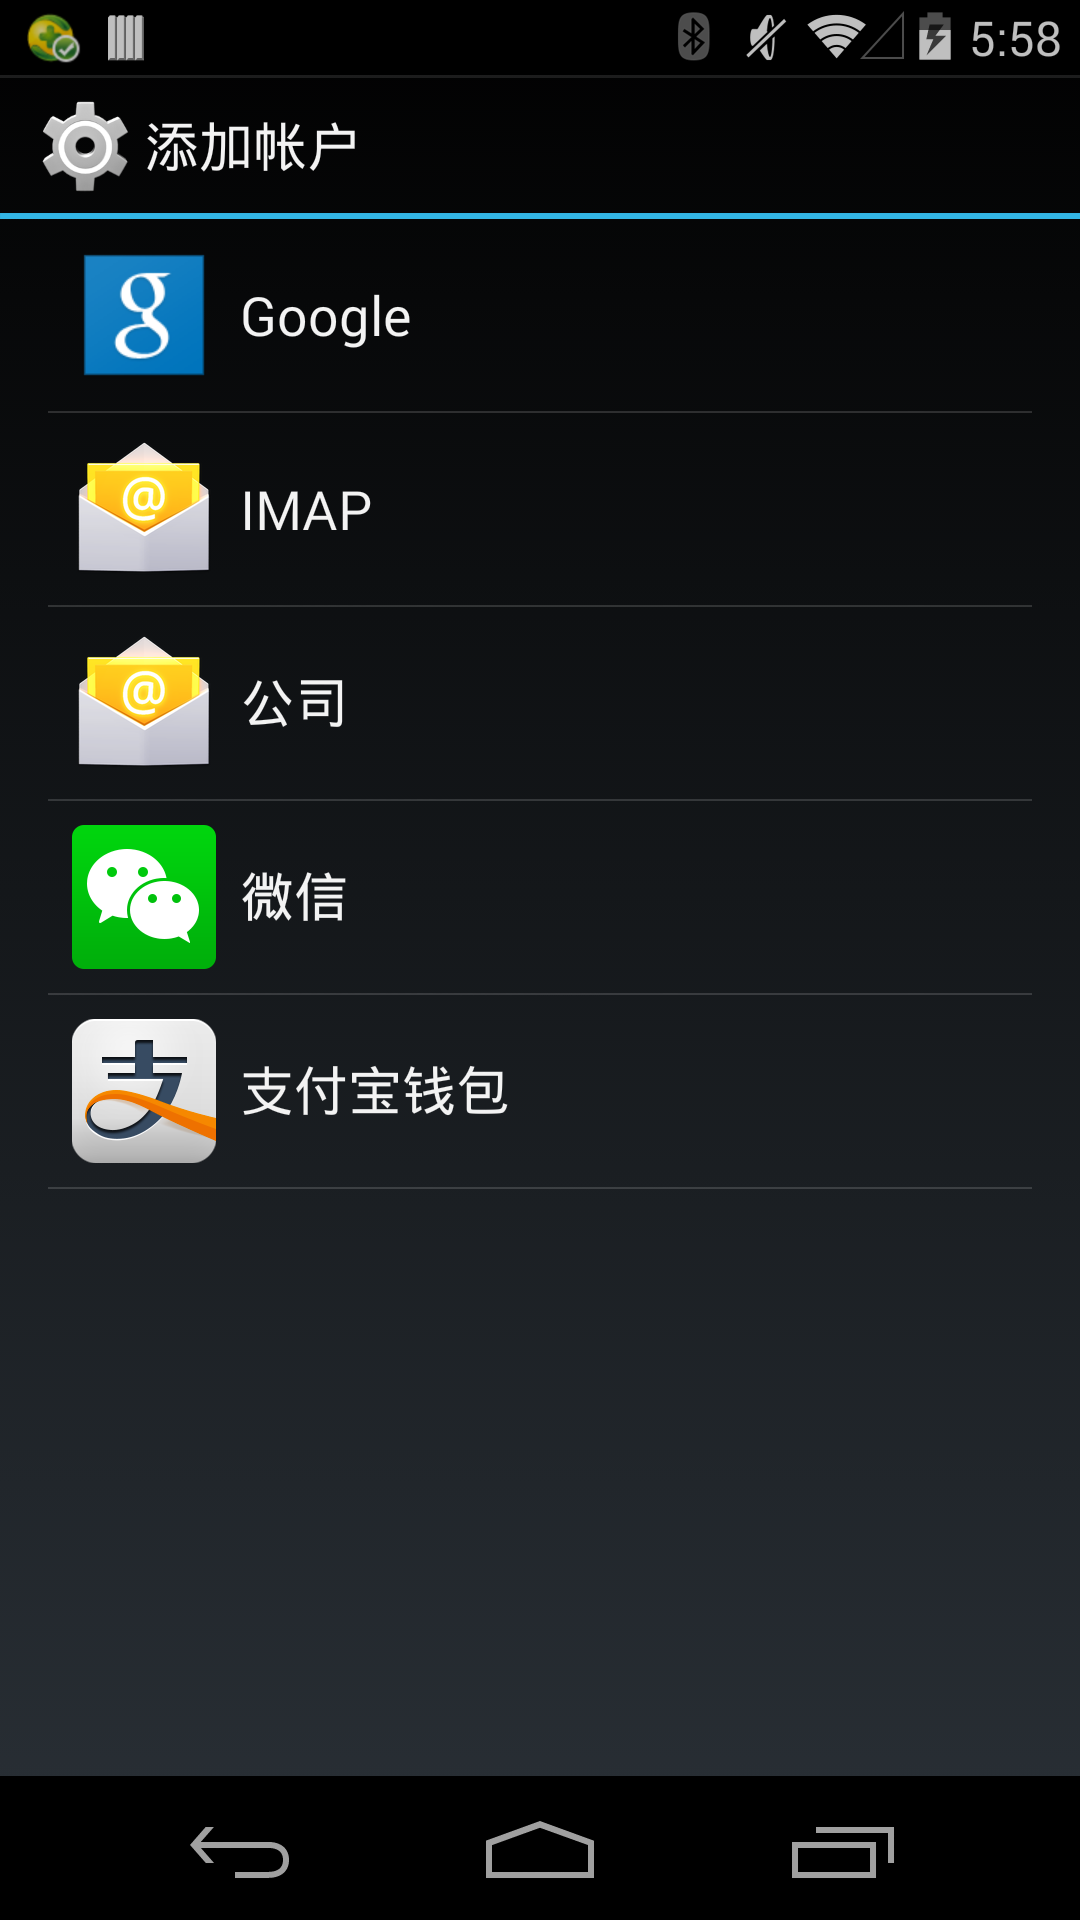
如果想要出现在这个页面里,应用需要声明一个账户认证服务AuthenticationService:
1 | <service |
并且在服务中提供一个Binder
1 | public IBinder onBind(Intent intent) { |
普通应用(记为AppA)去请求添加某类账户时,会调用AccountManager.addAccount,然后AccountManager会去查找提供账号的应用(记为AppB)的Authenticator类,调用Authenticator. addAccount方法;AppA再根据AppB返回的Intent去调起AppB的账户登录界面。
这个过程如图所示:
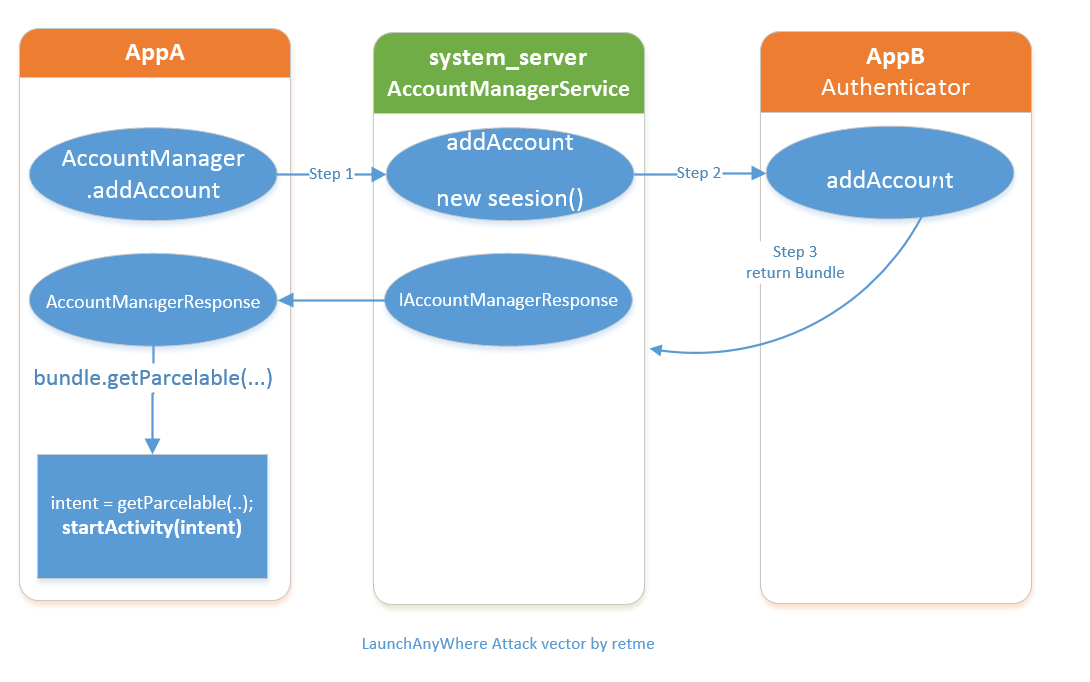
具体来说就是:
- AppA请求添加一个特定类型的网络账号
- 系统查询到AppB可以提供一个该类型的网络账号服务,系统向AppB发起请求
- AppB返回了一个intent给系统,系统把intent转发给appA
- AccountManagerResponse在AppA的进程空间内调用 startActivity(intent)调起一个Activity,AccountManagerResponse是FrameWork中的代码, AppA对这一调用毫不知情。
这种设计的本意是,AccountManagerService帮助AppA查找到AppB账号登陆页面,并调起这个登陆页面。而问题在于,AppB可以任意指定这个intent所指向的组件,AppA将在不知情的情况下由AccountManagerResponse调用起了一个Activity. 如果AppA是一个system权限应用,比如Settings,那么就可以调起任意应用的未导出Activity,导致权限的绕过。
但问题是,怎么才能让Settings触发添加账户呢?如果从“设置->添加账户”的页面去触发,则需要用户手工点击才能触发,这样攻击的成功率将大大降低,因为一般用户是很少从这里添加账户的,用户往往习惯直接从应用本身登陆。
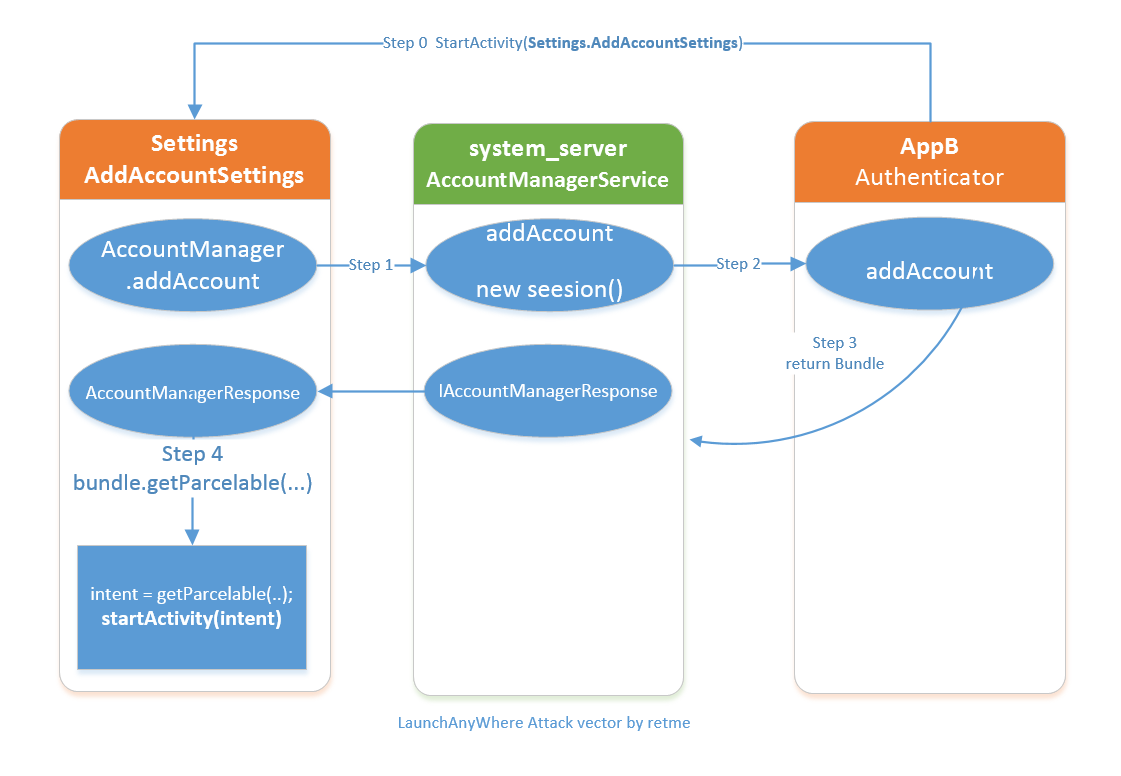
不过现在就放弃还太早,其实Settings早已经给我们留下触发接口。只要我们调用com.android.settings.accounts.AddAccountSettings,并给Intent带上特定的参数,即可让Settings触发launchAnyWhere:
1 | Intent intent1 = new Intent(); |
过程如Step0所示
安卓4.4已经修复了这个漏洞[4].检查了Step3中返回的intent所指向的Activity和AppB是否是有相同签名的。避免了luanchAnyWhere的可能。1
2
3
4
5
6
7
8
9
10
11
12
13
14
15
16
17
18
19
20
21
22
23
24
25
26+ @Override
public void onResult(Bundle result) {
mNumResults++;
- if (result != null && !TextUtils.isEmpty(result.getString(AccountManager.KEY_AUTHTOKEN))) {
+ Intent intent = null;
+ if (result != null
+ && (intent = result.getParcelable(AccountManager.KEY_INTENT)) != null) {
+ /*
+ * The Authenticator API allows third party authenticators to
+ * supply arbitrary intents to other apps that they can run,
+ * this can be very bad when those apps are in the system like
+ * the System Settings.
+ */
+ PackageManager pm = mContext.getPackageManager();
+ ResolveInfo resolveInfo = pm.resolveActivity(intent, 0);
+ int targetUid = resolveInfo.activityInfo.applicationInfo.uid;
+ int authenticatorUid = Binder.getCallingUid();
+ if (PackageManager.SIGNATURE_MATCH !=
+ pm.checkSignatures(authenticatorUid, targetUid)) {
+ throw new SecurityException(
+ "Activity to be started with KEY_INTENT must " +
+ "share Authenticator's signatures");
+ }
+ }
+ if (result != null
+ && !TextUtils.isEmpty(result.getString(AccountManager.KEY_AUTHTOKEN))) {
CVE-2017-13288
这个是一个关于PeriodicAdvertisingReport类序列化与反序列化不匹配的漏洞,我们先来看下源码
1 | @Override |
上面是这个类序列化和反序列化的函数,在序列化txPower这个字段的时候,写入的是Long,写入了8字节,但是在反序列化的时候,是调用了readInt读取,读取了4个字节,然后就导致了序列化和反序列化的不匹配。
但是这个有什么用呢?我们再一次回顾上面的LanuchAnywhere漏洞
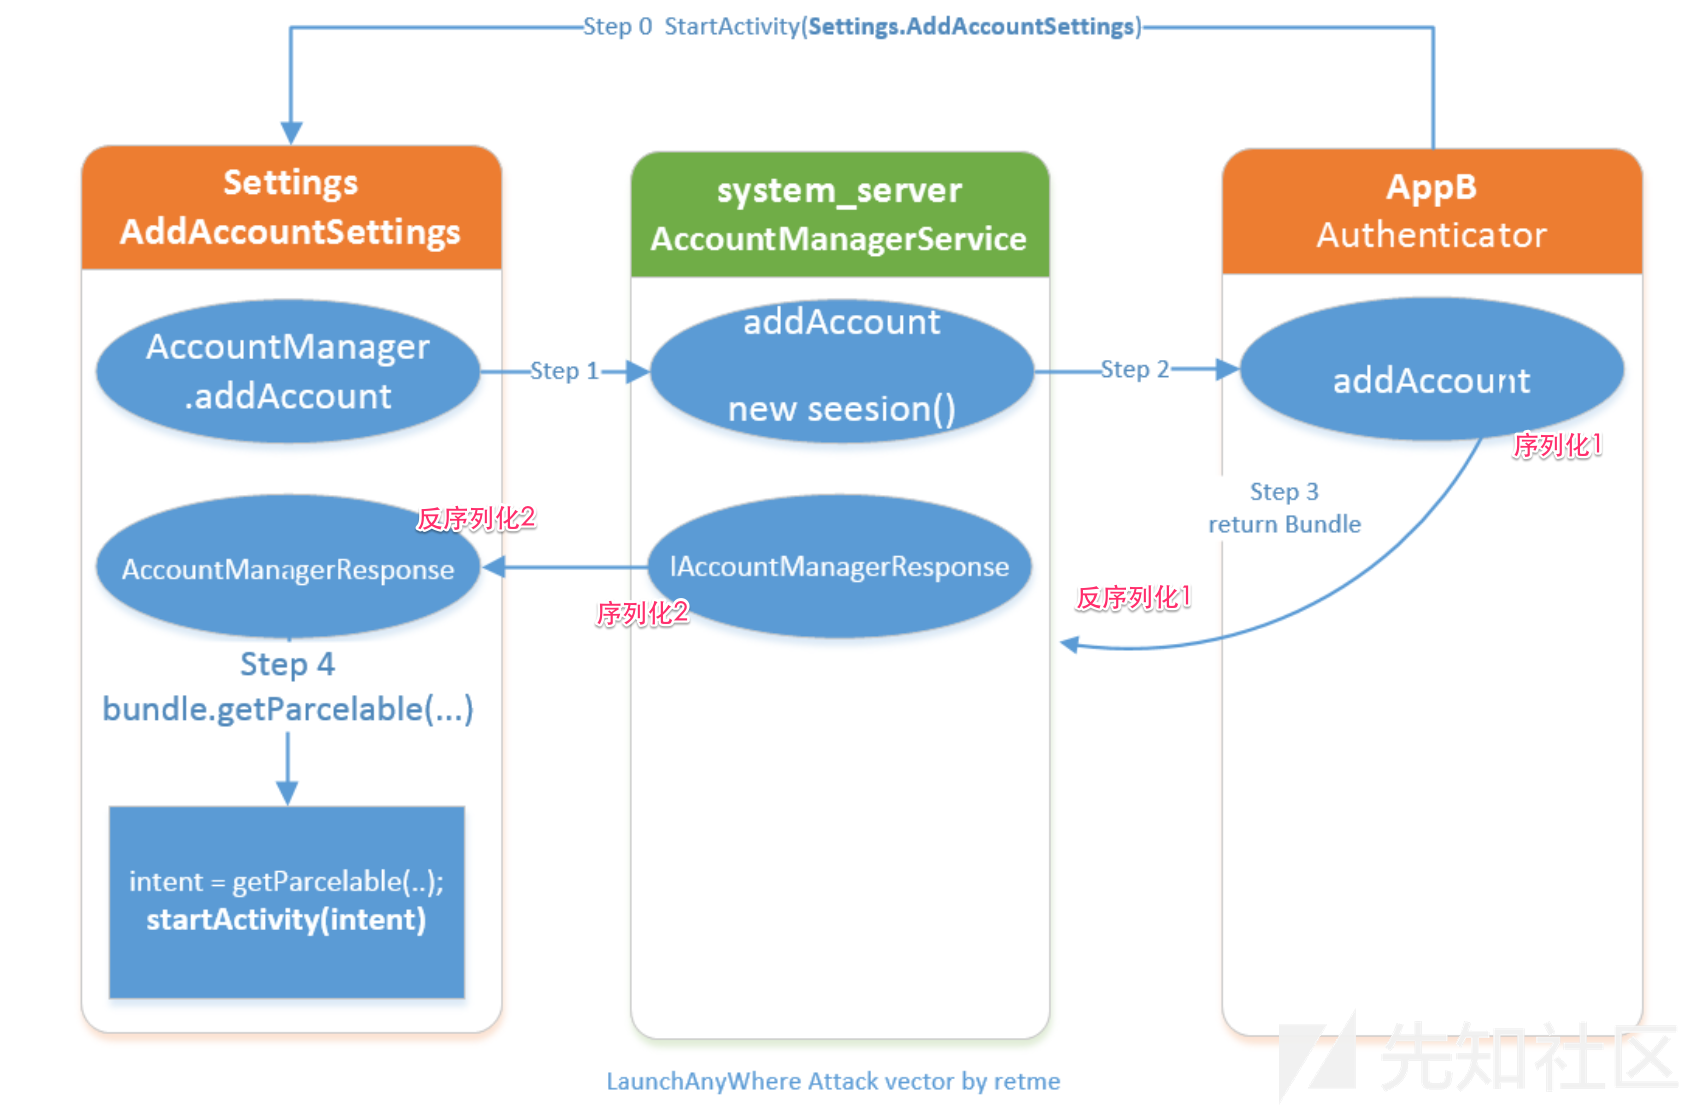
可以看到,从AppB到Settings一共经过了2次序列化和2次反序列化
- 首先是普通AppB返回了一共Bundle对象,这个对象包含一共键值对,{KEY_INTENT:intent},然后序列化为数据,传递到AccountManagerService
- AccountManagerService将数据反序列化为原本的类,检查其中是否包含KEY_INTENT这个键,包含的话,取出对应的值,然后检查对应的intent所指向的Activity和AppB是否是有相同签名的, 避免了luanchAnyWhere的可能。
- AccountManagerService将反序列化后的类再一次序列化,传递到Setting应用
- Setting应用进行反序列化,取出KEY_INTENT对应的值,调用startActivity方法调起对应的Activity
如果我们利用序列化和反序列化不对称的漏洞,就可以绕过AccountManagerService里面的检查了,那么具体怎么做呢?
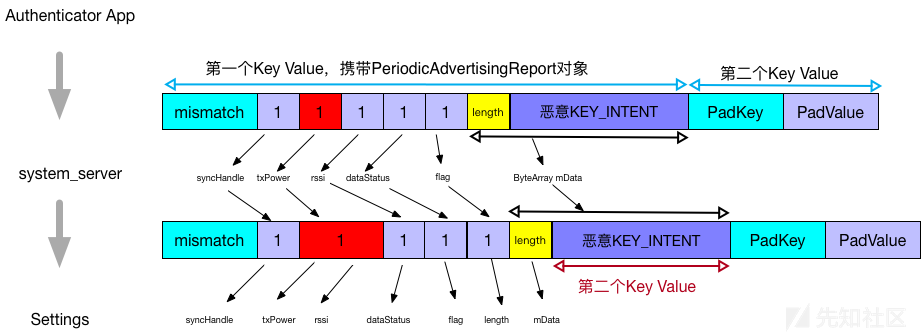
首先构造一个Bundle,有2个键值对,第一个Key Value,携带PeriodicAdvertisingReport类,第二个Key Value随便放点东西就可以了
在PeriodicAdvertisingReport类里面可以放一个恶意的KEY_INTENT键值对,在第一次反序列化的时候,还是作为PeriodicAdvertisingReport类的一个字段,所以没有被AccountManagerService检测出来
之后经过序列化和反序列化,Setting中取出的类里面,恶意的KEY_INTENT键值对就变成了第二个Key Value,然后Setting就会取出恶意的KEY_INTENT,调用startActity调用对应的Activity,达成攻击。
poc
最终的POC如下
1 | public class MyAuthenticator extends AbstractAccountAuthenticator { |